Showing posts with label Home Decor. Show all posts

Saturday, July 9, 2011

Coasters for My Bunco Gift

In my last post, you saw decorations that I made for the 4th of July Bunco that I hosted at my house.  Everyone loved the decor but the project that took the cake were the custom coasters that I made.

I made 3 sets of 4 coasters for the "Necklace Winners" in my Bunco group.  Here's what you need to make a set of your own!

Carts and Materials
  • Kate's ABCs - font for wording
  • Home Accents - flourish
  • Vinyl - I used brown Cricut Vinyl
  • Transfer Tape - I used Cricut brand
  • 4x4 Travertine Tiles - I found these at Home Depot
  • Self Adhesive Felt - for backing on the coaster

Making these coasters is really pretty easy.  I used my G to put my design together.  I was able to get 9 sets on one mat.  The test really came when it was time to remove the backing from the mat.

Once you have your design together and cut out, "weed" out the extra pieces of vinyl you don't want that are in the middle of letters like O and E.  Put your transfer paper on to your mat, rub and remove your cut out image from the mat.*  Before you apply the image, you need to wipe off each tile with a damp sponge to remove the grit.

*I put a post on the Circle MB because I was having some problems removing my paper backing from my mat once my image was cut.  I learned a few things fron this post.
  1. Use the settings 3-3-3 when cutting vinyl (speed, pressure and blade depth).  This will give you a "kiss" cut that only cuts the vinyl and not the paper backing.
  2. Use an older mat, not a really sticky new one.  This makes it easy to remove the paper backing.
  3. Once your image is cut, remove the negative before you apply the transfer paper.  This makes it so much easier to lift your image off of your mat.
I applied squares of self adhesive felt on the bottom of each tile.  I chose to do this because the little circles seem to come off easily.  But you could certainly use thos if you like.  Once I had all the tiles ready, I wrapped a stack of 4 with a pretty red satin ribbon.

I may have created a problem for myself.  Once the gifts were opened, everyone wanted a set!  I hope you like these coasters and try making them when you need a quick gift.  Don't forget to leave me some blog love and I'll see you later!

Smooches,


Thursday, July 7, 2011

4th of July Bunco Decor

Hi everyone!  It's been a while since I have posted.  I decided to take a break over the holiday while I spent time with my family and also prepared for the Bunco Party I hosted on the 5th. 

I have seen so many great decorations on the Circle Blog and on all the MBs that I had to make some for my Bunco party to make it special.  Here is what I made!


Here are the carts and materials I used.

Carts and Materials
  • Shall We Dance - Hat
  • Cindy Loo - exclamation marks on the hat
  • George and Basic Shapes - Stars
  • From my Stash - various buttons, twine, doillies, and paper
Notice that I did not mention the Stand and Salute Cartridge.  That's because I don't have it.  So how did I make the hat???

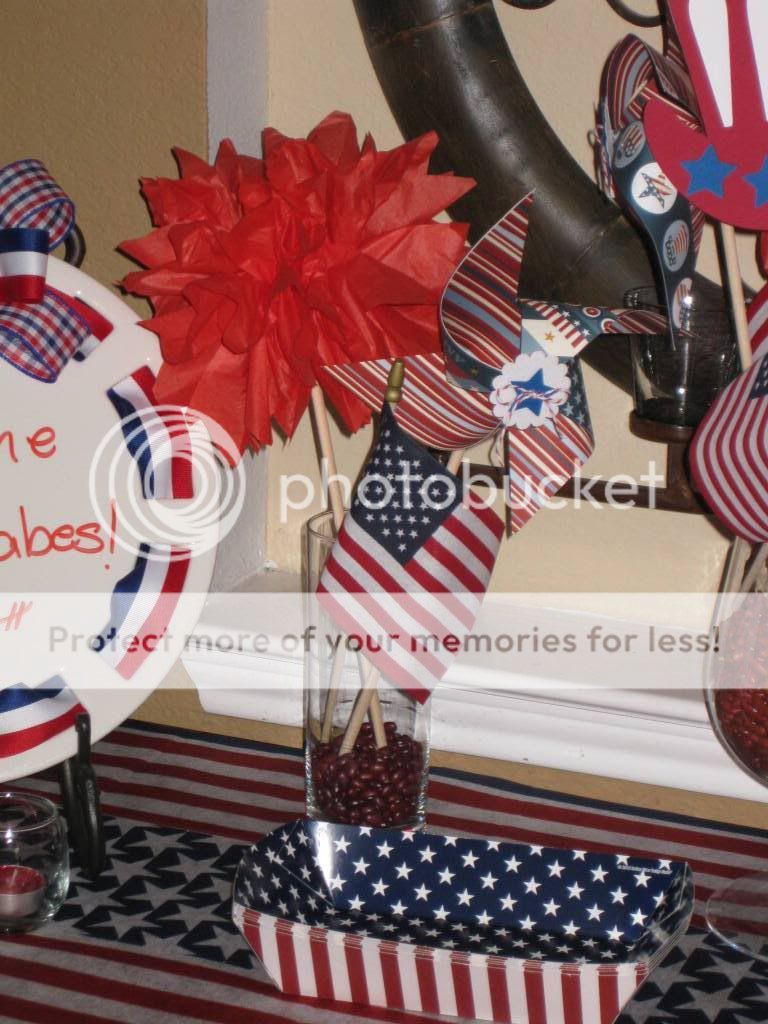
I found a hat on my G that I liked.  I then put some exclamation marks inside the hat to make the cutouts (I hid the dots).  I then made a second hat without cutouts for the background.  I cut out some blue stars seperately and added them to the hat with popdots.  I think it came out great!

I also made some pinwheels in small and large sizes.  These are very easy to make since I didn't have the Mother's Day bouquet cart either.  Once I pulled my corners together on the large one, I put a doily and 2 stars in the middle.  I finished it off with a button with postmail twine running through it.

The small ones were a bit more simple with a scalloped circle punched out of white glitter paper in the middle.  I then placed a star that had a contrasting twine bow glued to the middle of it on the circle. 

The red tissue paper bursts of color are what I call my "fireworks".  Don't they look like the fireworks once they have exploded in the sky?  I made these by folding 3 sheets of tissue back and forth like you are making a fan.  Snip the ends in a V for a decorative edge.  Next I stapled the fan in the middle and then spread the sheets of tissue paper apart.  Last, I hot glued some dowels in the middle so I was able to put them in the jar with the other stuff.

You can make multiples of everything so you can place them all around the room to carry the theme to everywhere your guest will be.  I even put a few in the bathroom!

Lastly, I welcomed my guests with a Southern Living plate that I ran holiday ribbon through.  I finished the plate off with a bow and a cute sentiment. 

I hope you get some inspiration from this project and make some cut decorations for your next gathering.  Until next time...

Smooches!

Monday, May 30, 2011

Spring Plate - Circle Blog Monthly Challenge Entry

I am pushing it here folks.  I have about 2 hours left to get my project entered into the Cricut Circle May Monthly Blog Challenge.  I just might make it!
This month's challenge was a Tic-Tac-Toe board where the crafter chose 3 squares in a tic-tac-toe formation.  Here is the 3T board and the red arrow shows what I chose to use in my project.

And here is my project!  It's a Spring Plate for my home.

Here is how I put this project together.

Carts
  • Base Camp - rectangle (welded to the grass)
  • Cindy Loo - font
  • Doodlecharms - sun
  • Gypsy Wanderings - grass, flower stem, butterfly
  • Nifty Fifties - daisy flower
  • Sugar and Spice - inside of rose
  • Tags, Bags, Boxes and More - rose
I got the plate from Wal-mart at Christmas time (there was a post on the blog using it).  It is about the size of a charger.


I used vinyl for the wording on this plate.


I used Juliana's directions and video to make the flowers.  I used different cuts but the results were still beautiful!


I love this sun cut!  It is my favorite and the one I go to when I need a sun for my project.

Side view so you can see the dimension on the flowers and all the buttons in the grass posing as flower buds!  I also used 2 layers on the butterflies that allowed me to pop up the wings. 


I hope you enjoyed this project.  Now I need to make one for Summer!  Until next time...


Smooches,


Wednesday, October 13, 2010

Cricut Circle Blog Weekly Challenge October 8th

It's funny when you think about where you get inspiration! I was at a local party supply store and saw a balloon with the cutest design on it. I immdiately said "I can make that into a card!" (It also gave me a reason to go buy the Carousel Lite cart!) So I pulled my phone out, took a picture with my camera and ran home to get to work. Luckily for me, my amazing friend and mother to my adorable God-daughter was having a birthday this week. Guess what card she is getting?!?! Making this was a double whammy - a cute card for her and a perfect entry for this weeks CC Blog contest.

Here are the details of the card!

Carts:
  • Carousel Lite - Girl
  • George - rounded rectangle
  • Home Decor - crown and flourish
  • Storybook - Birthday
  • Sugar and Spice Lite - scalloped rectangle

Pic of the Balloon - coming soon!


All the cuts on this card are pretty straight forward. I used the Tall creative feature on the Storybook cart to make the word "Birthday". I wanted the squeezed in look and that both words made a block. I played around with it on my G until I got the dimensions just right.


I hope you like the card and I really hope I win the Pink Journey cart. I have been wanting that one for a while. Wish me luck!

Smooches,

Robin
The Scrappin' Delta Diva

Thursday, August 12, 2010

Beautiful Crystal Chandelier Card

I am not an outwardly sassy, flirty girl. But I can be when I want to be! I do love a little pink and leopard print every now and then. I saw this paper and it made feel a little sassy and that was the inspiration for this card!

I love beautiful things and I have seen some very pretty colored crystal chandeliers lately. I have always wanted to make a card with a chandelier so this was the perfect opportunity. Here are the details.

Cart:
  • Home Decor - chandelier and sentiment

I cut the chandelier and the blackout at 3.4" x 3.12". I cut the sentiment at 3.59" x 1.24"


Once the pink chandelier was cut, I covered it with JudiKins Diamond Glaze. It is a water-based, dimensional adhesive. When the entire chandelier was covered, I dusted it Diamond Dust. This is finely ground glass that makes a beautiful affect.

Once the chandelier was dry, I began to assemble the card. I glued the background down. Then I glued the blackout of the chandelier in place. I glued the blackout of the sentiment in place and placed the sentiment on top. I used a piece of bling for the dot on the letter "i". I put pop dots on the "crystal" chandelier and put it on the card.

I hope you like it! Thanks so much for looking and leave me some comments and blog love!

Smooches,