Thursday, February 27, 2014

Turkey Toss Basket 2013

3 Peat!  3 Peat!

Hey Divas!  For those of you who have been following me for a few years, you have heard about the Turkey Toss Basket Contest between the departments at my school (Click here for the 2012 entry).  This is a project/contest we do to show appreciation to our custodians and share our blessings with them.  Each department puts together a basket full of Thanksgiving dinner goodness and the baskets are then given to one of the custodians on our staff.  My department has won the contest every year and guess what?!  We won again this year!  Here is this year's entry.


I work with an awesome Special Education department!  They are so giving and we have an appreciation for  each other's talents and gifts.  So the other members of my department provide all the goodies for the basket like mashed potatoes, gravy, corn and so forth.  They also provide money to purchase all the non-food items.  They have asked me for the past 3 years to put the basket together for the team so that's my contribution.

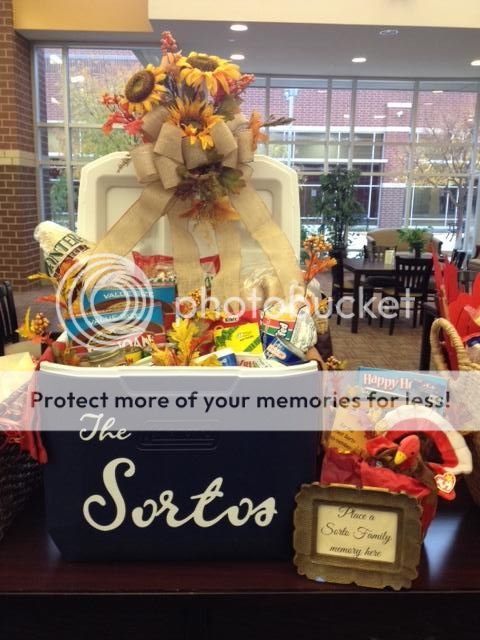
I must admit - I start thinking about what to do for next year's basket right after this year's basket it completed! ; )  I love doing this and challenging myself to come up with new ideas.  This year's inspiration came from Pinterest (Find me on Pinterest at Delta Scrapper).  I love using a cooler as the container because it will definitely be reused over and over again.  I used my Cricut machine to cut out the last name of the custodian in white vinyl.  I welded the letters together on my Gypsy.


I measured the front of the cooler to make sure my letters were to scale.  I love the way it came out.  So many of team members and other co-workers commented on how nice and practical this basket was.  I know the custodian loved it as well.

If you like what you see, please leave me some blog love in the comments section below.  You guys are the best!  Until next time...


Smooches!


Wednesday, February 19, 2014

Chalkboard Door With Vinyl

Hey Divas!  Yep, I'm back again this week with another project.  Don't faint! : )

I told you guys that while I was on a hiatus from my blog, I was still crafting.  This chalkboard door was one of the projects I completed during that time.  I just love it! 


Materials and Cartridges
  • Sentimentals Cartridge - "Welcome" image
  • Brown Vinyl
  • Chalkboard Paint

I got this idea from Pinterest (I'm so addicted!!!)  I went to a local store that sells all kinds of old goodies that can be altered.  I didn't have a large space for this project so when I found this old narrow door, I knew it was the one.  I loved the color and the aging on it appealed to me as well.  I wiped it down really good and then left it as it was.  


I got a small can of chalkboard paint and painted the inset using the edge as my defining line.  I gave it 2 coats so it would be nice and covered.  I cut "Welcome" on my Cricut using the Sentimentals cartridge.  This was an image, not a font, so it was already welded together.  I really love the formal, yet casualness of it. 


I realized that I didn't have the long Cricut mat so in order to get my letters the size I wanted, I was going to have to cut them out on 2 mats.  So I did.  When I adhered the vinyl to the door, I had to lay one part on top of the other in order for the finished product to look like one piece.  I think it turned out nice!

I added an old fashioned crystal knob, a small bucket and various colored chalks to complete the project.    I will use this door to post weekly scriptures in my home and other things I am learning about life along this journey.  I love that I can make it be whatever I want to with just an eraser and some chalk.  I f you like my Chalkboard Door, leave me some blog love comments below.  Thanks for checking me out and until next time...


Smooches!


Sunday, February 16, 2014

Coffee Lover Thank You Cards

Hey Divas!  Long time no see!  I have missed you all and it is good to be back on my blog.  During my absence from the blog, I have been crafting.  I just haven't posted my projects.  But I am back now so here is the first of many to come!

All my friends know that I love coffee!  Many of them do as well.  So having the Love You A Latte cart for my Cricut was a must!  My favorite brand is - you guessed it- Starbucks.  I made these cards with them in mind!


Here is what I used
  • Love You A Latte Cartridge - coffee cup
  • Jaded Blossom Stamps "Java Time" set - sentiments and coffee beans
  • Stampin' Up Inks
  • Fiskars paper crinkler

Jaded Blossom makes some really cute stamps for cards, treats and favors.  As a matter of fact, that is their specialty! Check them out by clicking here.  But please know that you can use their stamps for so much more.  For those of you that have a Silhouette or the new Cricut Explore machines, they also make SVG cuts to go along with some of their stamps. Isn't that awesome!  I used 2 of their sentiment stamps from the Java Time set on these cards.  Here is one up close.

I think the crinkled paper is reminiscent of the sleeves that Starbucks puts on our coffee cups.

I stamped the beans in 2 different colors of brown ink and then the green.  Looks like the different stages coffee beans go through before they make the good stuff that is in your cup. (yeah, I know too much about coffee beans! )

These will probably get a gift card added to them and given to someone sweet.  If you like my cards, be sure to leave me some blog love below in the comments.  Until next time...


Smooches!


Saturday, March 30, 2013

Feel Better Soon Card


Hello everyone.  Now, before you faint, yes I am posting twice in one week.  But I have made a couple of things lately that I wanted to share.  I needed to send out a Get Well card.  I had been seeing this technique called Triple Stamping on some beautiful cards and so I decided to try it.  It was so easy!  Learn about it by watching this video.  Here is my Get Well Card using this technique.
 
 
Materials
  • Stamp - Fabulous Flowers Set (SU!)
  • Inks - Summer Sun, Green Galore and Pretty in Pink (all SU!)
  • Stash - papers, pop dots, sentiment stamp
Dimensions
  • Card Base - 5x7
  • White - 4x6, 3x5 and 2x4
  • Green - 4.5 x 6.5, 3.5 x 5.5 and 2.5 x and 4.5

 
I stamped the image with the 3 different inks.  I green paper to each layer and began to stack them.  I stacked the largest 2 layers right on top of each other.  I put pop dots on the smallest layer for dimension.

I stamped the sentiments on a small strip that I rounded the corners on with my corner rounder.  I then put pop dots on it and placed it on the card.

I am very pleased with the way this card came out.  The colors and everything just came together well.  Leave me some love telling me what you think of my card.  Until next time...

Smooches!

Robin

Wednesday, March 27, 2013

Easter Tags

Hello everyone!  Easter season is upon us and I made a few treat bags.  I took them to my scrappy friends I scrap with each month.  They loved them.  Here they are!


Materials
  • Stamp - Chocolate Bunny by SU!; Happy Easter - $1 bin at Michaels
  • Inks - Close to Cocoa, Basic Brown, Chocolate Chip and Glorious Green (all SU!); Tattered Rose (Tim Holtz)
  • Punch - 1 3/4 in circle (SU!)
  • Stash - white tag, button and raffia
I stamped the bunny image 3 times in 3 different colors of ink.  I wanted to make it look like different flavors of chocolate.  I then stamped the sentiment and punched it out with my cricle punch.

I edged all the pieces with the TH Tattered Rose ink to give it a more vintage look.  Topped the tag off with a button and some rafia to complete the treats.

These tags were simple and easy to make.  So if you are needing to make a large amount, think about using this design.  Let me know what you all think about them and I hope to see you back here soon.  Have a very Happy Easter!  Until next time...

Smooches!

Robin

Saturday, February 16, 2013

Valentines Day Buckets

I made a couple of Valentines Day Buckets for some of my favorite little people!  Here they are.


Materials
  • Carts - Love Struck, Robotz
  • Jaded Blossom Stamps - Valentines Treat
  • Papers - Basic Gray "Shine On" for the robots; my stash for the V-Day Love
  • Action Wobbles on the lids
  • Punch - Martha Stewart
  • My Stash - ribbons, bling, twine

Here's the bucket for my God daughter.  I call this one V-Day Love.


Love Note on the lid.

The love note is on an action wobble.  I love these things!


Here is the bucket I made for my God Son.


Closeup of the girl robot.

Closeup of the boy robot.

On the lid, I put a robot who is in search of his true love.

 The robot is on a action wobble as he moves up the hill.
 
I hope you like my buckets.  My God children did.  They were so proud to take them to school.  Please leave me some blog love and tell me what you think of my buckets.  Talk to you soon!  until next time...
 
Smooches!
 
Robin


Tuesday, January 29, 2013

Tagapalooza - Birthday and Valentine Style

Hey Divas!  I'm back with 3 tags I made - 2 for birthday and 1 for Valentine's Day.  Here they are!


Materials and Cartridges
  • Party Hat and 6 - Birthday Bash Cartridge
  • Latice Tag - French Manor Cartridge
  • 8- Letter Envy Cartridge
  • Butterfly - Paper Trimmings Cartridge
  • Ink - SU Pink Passion and Whisper White
  • Valentine's Paper - "Sweet Love" by Little Yellow Bicycle
  • Happiness Birthday Stamp - Jaded Blossom "Sweet Birthday Wishes" collection
  • Stash - everything else

Here's aValentine's Day Tag I made with a collection of papers I just love.  Isn't it cute?!

What's a tag without a little bling on it?!  I added some bling on the doily I used for the background.  I layered on a fabric tag that I added a gingham bow to.  I love all the pinks and reds.


The collection include a bunch of Journaling Tags.  So I included one of those on the tag.  I added a row of TH rose ribbon on top of that with more bling in it.  It finished off the tag nicely.

Here's a tag I made for an 8 year old.  I wanted to make a butterfly taking light because I think that's exactly what she is doing.  

I used the Martha Stewart Coarse Glitter on the 8 and the buttergly to make it sparkle.  I stamped the sentiment on a little flag.  So cute!

The butterfly is 3-dimensional with it's wings standing up.  It really turned out nice and makes a great statement on the tag.

This tag is for my gorgeous God-daughter, Layla.  She was turned 6 this month.  So I made this tag for her gift bag.  

I made these tags at a crop with my crafty friends.  She had some of the new January release stamps from Jaded Blossom, including the Sweet Birthday Wishes set.  I used it at the top where I also placed a bow made from seam binding and some bling.

My sweet God-daughter is very stylish.  She loves anima print so I included that on her tag.  I then took it over the top with the bling in the shape of the 6.  I added more bling on the hat to top the whole tag off.  I edged the cream base with the pink ink to bring that finish to the tag.

I am very happy with all 3 tags.  If you like my creations, leave me some blog love and let me know.  Thanks so much everyone!  Until next time...


Smooches!!


Robin