Wednesday, December 26, 2012

Secret Santa Christmas Mini Album - Pic Heavy

Hello Peeps!  Merry Christmas!!  I wanted to share a mini album I made this holiday season.  I am a member of a group on Facebook called Crafty Girl.  My talented friend and founder, Jennifer Flatt, decided to do a Secret Santa with group members.  I was a Secret Santa to Ema Martinez, whose talents with Copics make me drool!  Anyway, on her list of things she likes was mini albums.  I didn't need to ready any further because I knew what I was going to make for her.  Here is my creation.

I used all sorts of items from my stash.  But here is the best account I could put together of the various materials I used.
  • Paper - Anna Griffin's Calisto Christmas Paper Pack
  • Glimmer Mist - Gumdrop
  • Tim Holtz Inks - Fired Brick, Pine Needle and Vintage Photo
  • Tim Hotz Pins and Charms
  • Cricut Cartridges for Ornaments - Paper Trimmings and Christmas 
  • Cinch Machine and Coiled Binding Wire
  • My Stash - doily, flowers. leaves, fibers, tags, buttons, stamps, mini clothes pin

 
Here's a closeup of the cover.  I used a doily that I spritzed with Glimmer Mist for my base and then started to pile on the goodies from there.  I am pleased with the way it came togehter.  It looks camera ready! : )

Let's get inside to the pages.
Even though this was going to be a mini album, I wanted to put a lot of real estate in it for Ema to put her pictures from the season. So I decided to make the pages fold out pages.


Page 2 - this page has an ornament I cut from the Paper Trimmings cartridge.  I added a gold button for the finishing accent.


Page 3- This page got a pocket for a vintage tag to collect all those memories.  These kinds of spaces will become important in years to come when you look back at this mini.

Page 4- I put an orment on this page that was cut from the Christmas cartridge.  I left the right side loose so a picture could be slid under it.


Page 5- Another tag to jot down the feelings of the season.  The older I get, the more important these things are.  The spirit and the feelings are what make the moments special!


Page 6- Another cute little tag for memories to be kept.  I left space for a picture as well.


That's it for this mini.  I think Ema loved it from what she said on her post.  I certainly enjoyed making it for her.  Until next time...

Smooches!

Robin

Monday, November 26, 2012

Turkey Toss Basket 2012

Hi everyone!  I have been crafting this Fall quite a bit.  But as usual, my crafts go out to others and many times I have forgotten to take pictures.  But this time I didn't.

I am fortunate to work at a school who values everyone's contribution to making the school a success.  Each year at Thanksgiving, different departments are assigned a custodian to make a Turkey Toss Basket for.  We bring traditional Thanksgiving food items and anything else we want to make our basket the best of the competition.  For my department, I volunteer my crafty services to put our basket togther.  Here is a picture of my creation this year.


Here's how I put the basket together.  I bought a large utility tub from Lowes.  I cut the word "Drinks" out of outdoor vinyl in maroon and gold which are our school colors.  I used my Cricut and the Martha Stewart Elegant Cake Art Cartridge for the fonts and to cut the vinyl.


Once I applied the vinyl (this was my first time double layering vinyl - I need some more practice! : ), I stuffed the bottom of the tub with newspaper to build it up.  I then laid a piece of orange burlap on top of the newspaper.  Then, I layered in the food and household items.  I took a plush fall garland and wrapped it around the rim of the basket. 


To take our basket to the next level and keep the whole family involved, I made a "Bucket of Fun" for the kids.  It included some coloring books, a few toys and supplies to make Thanksgiving cupcakes.  I decorated the bucket with text messages and speech bubbles from the Smiley Cards Cartridge.  I then cut "bucket of fun" from the Martha Stewart Elegant Cart Art Cartridge.


UPDATE:  I just wanted everyone to know that we did indeed win the contest!  I really do have an awesome team that I work with.  Yeah us!!!!

Thanks everyone for checking out my post.  Leave me some blog love and until next time...

Smooches!


Robin

Sunday, October 14, 2012

Halloween Wreath

Hello crafty peeps!  I hope this post finds you enjoying some beautiful Fall weather.  Today, I am sharing with you all a Halloween Wreath that I made for my door.  I got the idea off of Pintrest (my newest addiction!).  I have been pinning for almost a year now and I can't get enough, espeically when I get inspiration like this!  Here is my version of the wreath.


Materials and Supplies
  • Foam circle (any size would work; this one is 14 in)
  • Black yarn
  • White Yarn
  • Halloween Picks (leaves, skull, raven, flowers, etc.)
What drew my attention to this wreath was the contrasting black and white sections of the wreath.  Because I wanted my alternating colored sections to be even (or close to it), I took the time to measure out sections and mark them on the foam wreath.  I first divided the wreath into 4 even sections.  Then I decided to I wanted there to be 3 smaller sections in each quadrant.  I drew lines on the foam with a sharpie marker and started wrapping the yarn. 

*Tip - when it got close to time for me to start wrapping the next color, I would get the starter end of the new yard and secure it underneath the old yarn as I wrapped it to the sharper line.  I would then cut a little extra of old yarn and secure it underneath the new yarn as I started wrapping it.  This kept me from having to knot the yarn and kept my wreath smooth.


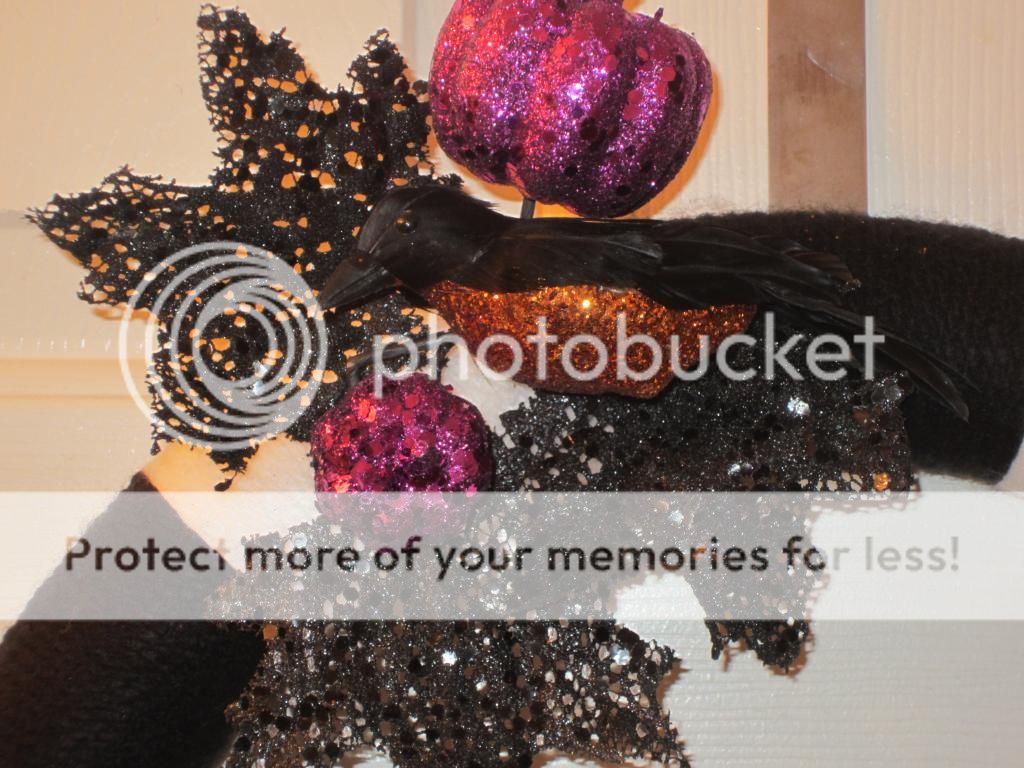
Once this was complete, I started deciding where to put my pics.  I knew that I wanted the alternating black and white pattern to show so I went with a "Less is More" kinda placement. First in was the black leaves and pumpkins (these were all on one pick).  I fanned them out knowing other stuff was going on top of them.  I started out this project thinking I was going to use the Coffee Filter Flowers that I saw Teresa Collins make on My Craft Channel (click here to watch video).  I stamped the filters and they where well on their way to what I wanted them to be.  But I decided to spray them with orange mist and that made the already thin coffee filters very flimsy.  I didn't think they would stand up to the weather outside so I scrapped them and decided to go with some large fake orange peonies.  I love the rich color these bring to the wreath.  I then added the huge sparkly purple skull and I was giddy!


I like Halloween stuff that is erie but not over-the-top gorie or scary.  So the black and orange raven at the pick that I found was exactly the kind of thing I was looking for.  I carried the purple to the top with the pumkins and added some more black leaves. 

I am very pleased with how my wreath came together.  My door is ready for the season - now I just need to get the rest of house there!

Check me out on Pinterest.  You can find me under Deltascrapper or Robin Clark.  I have lots of boards with great stuff like food, crafty goodness and funn stuff.  you can find the inspiration for this wreath on my Fall and Halloween board.  Until next time...


Smooches!

Robin

Saturday, July 14, 2012

Perpetual Card Organizer and Calendar

Hey there Divas!  How have you been?  I have been crazy busy with the end of the school year, our first graduating class, a cruise and much more.  But I'm back with another project from the crafting retreat I went on in May.  I am going to show you how to take this...

and turn it into this!


Here's what you will need!

Materials and Supplies
  • Coordinating Papers - I used a kit from Crate Paper called Cottage Collection Kit
  • Chipboard for covers
  • Binding - I used my Cinch and a 1 inch spiral binding wire in Spun Sugar (clear)
  • Printed calendars (attached below)
  • A5 card bases and envelopes
  • Various embellishments of your choice - ribbons, flowers, etc
This is a Perpetual Card Calendar and it is so easy to make!  I have to give a shout out to my girl Kim, aka Bling Dazzler for sharing this project with us at the retreat.  What made my project so easy to make was that I used a scrapbooking kit with double sided paper.  You will definitely want to use a kit because everything is already coordinated.  Most kits include embellishments that will make the card making really easy.   Watch the video below on how to make the pages and covers.

 
After you make the pages, you will need to bind everything together.  I used my Cinch but like I said in the video, you can use whatever you have - Bind It All, loose book rings, etc.  Once you have everything bound, print out your calendar pages and cut them out.  I cut mine 3 3/4 x 5 1/2.  These measurements make them fit on the pages perfectly.  There should be 12 pockets for the 12 months of the year.  Glue one month on each pocket.

Once you have all your calendars in place, it is now time to work on the cards.  Use a card base that coordinates with your papers.  My papers had cream in them so I used cream cards.  Use the various elements and embellishments in the kit to decorate your cards.  


Stick your cards in your pockets, add some ribbon to your binding and you have a completed project.  I added a cute plaque to the front and put some dimensional brads on it to add a little more to the front.  You can add as many embellishments to your project as you want to make it as unique as you are.

To download the FREE file of the calendars, click here!   Remember to cut these calendars at 3 3/4 x 5 1/2 so they will fit on the pages perfectly.  If you decide to make an organizer, send me a pic of it to deltascrapper@yahoo.com.  I would love to see what you made.  Until next time...

Smooches!


Friday, May 11, 2012

Mother's Day Shadow Boxes

I wanted to end my posts of projects from my retreat with these projects but I couldn't wait!  These are my most favorite projects of the weekend and I am so proud of them.  Here are my Mother's Day Shadow Boxes!


Carts and Materials
  • Flower Box - flowers
  • Gypsy Font - monogram letters and background
  • Michael's - shadow boxes
  • My Stash - paper, glitter, bling, flocking, Perfect Pearls mist


I almost couldn't believe that I made these boxes!  They came out exactly how I pictured them in my head.  Well, almost.  My orignial idea was all white.  But I couldn't find this size shadow box in white so I had to change my idea.  I am really glad I did.


The detail in my shadow boxes are in the flowers.  There are several different shapes of flowers in the boxes.  The larger flowers have different layers that are either spritzed with Perfect Pearls mist in Perfect Pearls or Coarse Glitter by MS.  The centers are flocked with with flocking.  The smaller flowers had layers that were misted or covered in glitter.  All the flowers received a little bling for the centers to complete them.


Once assembling the flowers were completed (and that was a while!), I moved on to the monogram letters.  I used the Gypsy Font that comes on the Gypsy handheld design machine. 

I chose this font because of the embellished side.  I love the effect of it offset to the side of the box.  I added some bling at the suggest of my table mates and complete.


I hope my mother-in-laws love these boxes.  I have gotten lots of compliments on them from family and friends who have seen them.  Leave me a comment and tell me what you think.  Until next time...


Smooches!

Robin

Tuesday, May 8, 2012

Teacher Appreciation Tag and Card

Hi everyone!  I am here with my first two projects from my retreat this past weekend.  Since it is Teacher Appreciation week, I thought it was appropriate to make some tags and cards for my fellow educators.  So here they are!


Carts and Materials
  • Doodlecharms - green apple
  • Plantin Schoolbook - red apple
  • MS Elegant Cake Art - loop border
  • Stamps - "Teacher Appreciation" set by Jaded Blossom
  • Twine - The Twinery
  • My Stash - lace, buttons, inks and paper


I started with a sparkly green card for the base.  I layered the loop border on with 2 kinds of twine and some pretty wide lace.  I then layered on some apples for that teacher influence.  Finally, I ran the twine through a large red button and then tied a bow.  I really like the way it all came together!


Now, for the tag!


I started with a natural card base.  I inked the edges with Tim Holtz Distress Ink in Vintage Photo.  I then added the loop border and lace.  I added the apples and glued on the button and twine.  I stamped the sentiment on a punched out tag, ran some ribbon through the top and and called it done. 


I have to send a shout out to my friend Stefani for letting me borrow her Teacher
Appreciation stamp set by Jaded Blossom.  It really helped complete the tag and card.  That's all for now.  I'll post another project soon.  Until then...


Smooches!

Robin


Friday, May 4, 2012

Hello Everybody!

I know, I know!  It's been a looong time since you guys have heard from me.  All I can say is life can throw you some real curve balls.  And you better be paying attention or they will knock you down!  I had to take some time off from crafting to take care of life business.  But by the grace of God, I am back!

As a matter of fact, I am at my very first scrapbooking retreat this weekend.  I was invited by my good friend Stefani Chastain to attend with her and a group of ladies.  It's sort of a mini reunion of the wonderful friends I made last year at the Cricut Stampede - Stefani, Kim and Miro.  We are in picturesque Tyler, Texas at the luxurious Memory Lane Inn.  I can't believe this place!  It is a crafters dream!  They have thought of everything and left no stone unturned.  Check out their website at http://www.memorylaneinn.com/.

There are 13of us here and we are already having a blast.  I will be posting pics of the weekend and my projects next week.  Be sure to check back to see what crafty goodness I have whipped up.  Until next time...


Smooches!

Robin

Tuesday, January 17, 2012

December Card Swap Card - Thanks

Happy New Year Divas!

With the kind of 2011 I had, no wonder I am starting my new year off by posting December's Card Swap card!  But I guess it is better late than never.  So here it is.


Carts and Materials
  • Paper Trimmings Circle Exclusive - rectagular frame and decorative oval frame
  • Opposites Attract - Oval
  • Decorative Paper - Recollections brand from Michael's
  • Ribbon - stash
  • Stamp - Stampin Up!

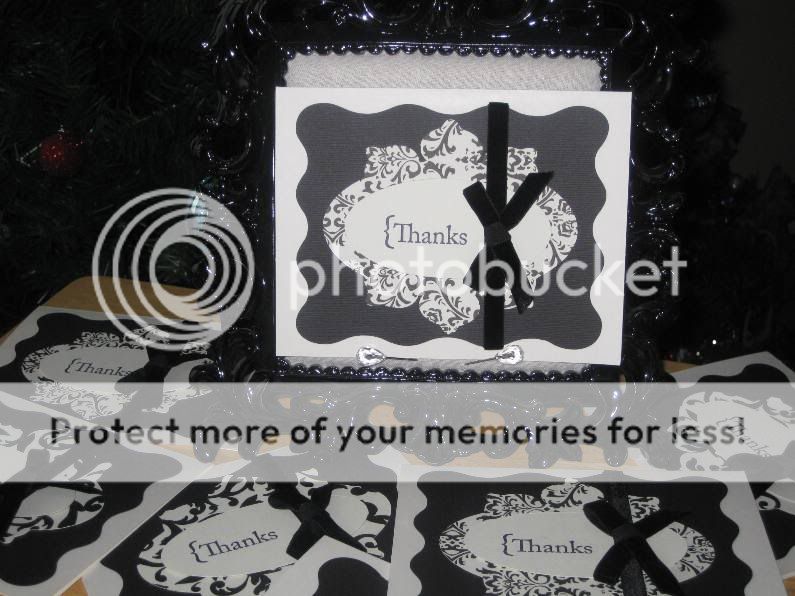
You know how you get something new and you can't wait to use it?!  That's how I felt about this cart.  I was really looking forward to this cart because I felt I could do a lot with it.  I was right. 


Since this was a larger card, I tweaked the backgrounds a little by stretching them on my Gypsy to fit my card base.  The oval shaped mat using the decorative paper is actually a circle.  So you can see how versatile this cart can be.  I used a stamp I had from SU! to stamp my sentiment on the basic oval.  That's one thing I love about the Gypsy - I was able to layer my oval on top of my design to make sure it fit perfectly.  I love that!


I added the final touch with a velvet ribbon and bow.  I think it adds a touch of elegance and ties the whole card together.  I tied the bows individually and glued them to the strip of ribbon after it was attached to the card. 

You can see from this picture that I used a couple of different design papers to mix it up a little.  I like the way they came out and I hope you do too.  Leave me some blog love and let me know what you think.

Until next time...


Smooches!

Robin