Thursday, July 29, 2010
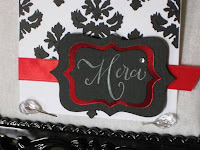
Merci Card made with Martha Stewart Elegant Cakes Cart
I got the new Martha Stewart Elegant Cake Art cart from HSN and I was dieing to use it. There are so many classic Martha cuts on this cart that could work well with cards. Well I saw this accent , loved it and thought "I could use this as a background. So I started cutting. I cut out 10 thinking I would have a few extras for mistakes. When I took the mat out, I realized that the cut is actually 2 pieces each, not one (this cart is not on the G yet). I knew it was going to take a little more work than I anticipated but I proceeded.
When I started glueing is when I realized what I had done. Lineing up all those pieces was horrible. I know what I am good at and what I am not. Exact measurements has never been my forte'. I started in the middle (my best idea) and went from there. By the time I put 4 or so on the paper, I was ready to throw in the towel but I didn't. The more I completed, the better it looked and that kept me going.
When I had 7 accents on the card, I was going to stop. But then I decided to cut one in half (crazy, right) and put the halves on the sides of the middle one. I really like the finished look. I cut out some marquees from the Storybook Cart and layered them. I stamped "Merci" in white with my SU! Craft Ink and added a piece of bling for the dot. I decided I needed to include more red so I cut a piece of ribbon, glued it down, pop dotted the marquee and placed it on the card.
I really am happy with the way it all came together! I don't know if I will be making this card again but at least I did try it. Thanks for looking and leave me some comments!
Smooches,
Robin
The Scrappin' Delta Diva
Tuesday, July 20, 2010
Great Idea! 30 Minute Cards
Saturday, July 17, 2010
Tim Holtz Reinker Technique Picture Tutorial
Step 1: You will need very few supplies for this technique. They are: a bottle of TH Reinker, a nonstick craft sheet, a heat gu, a spray bottle of water and a paint brush (I used s small one for the thinner handle)
Step 4: Using the wooden tip of your paint brush, start to swirl the ink and the water around together. This will start to make smaller drops/pools of ink. It will also thin the ink out with the addition of the water.
Step 5: When you have spread out your ink, take your piece of white cardstock and tap into your drops/pools of ink. Cover as much are as you can and soak up all the ink. Turn your paper over so the ink side is up. The paper will probably be curled but don't worry. It will straighten out in the next step.
Thursday, July 15, 2010
Boys and Their Toys Card
Carts:
- Sugar and Spice Lite - wagon
- B is for Boy Lite - all the toys
For those of you who have been following me, you know that I started a recent love affair with the Tim Hotlz inks. They are amazing and here is yet another reason why. I made the background paper!!!!! Yeah, uh! I'm stepping up my game. I wanted to use the TH inks but my eBay order had not come in with all my differnt shades of blue. So I only had Broken China in the reinker on hand. I knew that you could spray a craft mat with water was one way to use his ink pads so I decided to do that with the reinker and see what happened. I dropped a few drops of ink on the mat, sprayed it and swirled it around with the tip of a paint brush. I then dipped my white cardstock in it and turned it over. By the look in my eyes you would have thought I had found Fort Knox (or won a golden Cricut!). I repeated this step a couple of times and the results are what you see. I am very pleased with this technique and will be doing it again. I am going to make a post with pics for this technique by the end of this week.
I then cut the wagon out using the Sugar and Spice cart. I don't know why they have a wagon on the girl cart and not the boy but they do. I had to work on this wagon a little. I wanted the handle and the detial to be silver. So I cut the base in silver. But when I went to layer it, the wheels were silver. So I ended up have to cut another bas in black, punch holes in the wheels for the "hub cap", trim it so the sliver line would show and glue it under the red layer. So that is why there is a little adhesive on the "hub cap".Next, I cut all the layers for the toys. This was a lot of small work but it paid off big time. I just love all the details in the toys. I colored the details on the Jack-In-The-Box's face on because the cut outs were way to small to glue on.
I put pop dots on the wagon and put it on the card. I then glued the toys to the card, making sure to put some of it below the line of the wagon so they look like they are "in" the wagon. I was going to put a title on there but when I finished, I thought it was perfect the way it was.
I don't think I could be happier with this card than I already am, especially since boy and guy cards are so hard for me. TFL!!!
Smooches,
Monday, July 12, 2010
Christmas Eve Night Card
- Christmas/Noel - everything except the snow hill.
I love the Christmas/Noel cart! The cuts are so beautiful, big or small. So I pulled it out and cut the sleigh, reindeer and trees and their layers.
I made my own Glimmer Mist with Perfect Pearls in Perfect Pearl (white) and Distress Ink Reinkers in Broken China. I sprayed the white background paper and dried with with my heat gun. I made about 3 layers for the rich color. I can't wait to get other colors of blue to create more depth! (watch for future projects)
When I was watching ALL of the TH's demo videos on his site, I saw him use Adirondack Arcylic Paint Dabber in Snow Cap (the color) on a project. I knew that would give a good snow affect on projects so I got one. I used it on the trees and I like the way it came out. I cut out a snow hill by hand, glued it on and glued the trees on top of the hill.
I put pop dots on the reindeer and the sleigh to raise them up and give the illusion that the trees were way off in the back. I drew the North Star on with a gel pen and it was complete. I will definitely be making more of these for the Christmas holiday. I should have more ink colors by then and I think that will give the card a whole different look.
Saturday, July 10, 2010
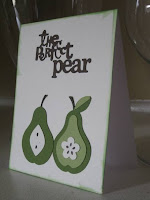
The Perfect "Pear" Couples Card
I noticed how they had so many differnt cuts of pears on there and decided to use them to my advantage. I like to put a "play on words" in my cards and these pears played right into my game. Here are the details.
Carts
- Sweethearts - 'The Perfect..."
- Preserves - everything else.
I used a really pretty cream for the background and accents on the pears. I inked the edges of the card with my Wild Wasabi ink pad from SU! (this was a seasonal color a couple of years ago and I am so glad I got it). I love the way the pears came out!
When I cut out the sentiment, it had the word "Pair" on it. I cut that off and replaced it with the word "Pear' from the preserves cart.
****There is something hidden on this card or rather not that overt. The first person to guess what it is and leave a comment on my blog will receive some blog candy from me! Good Luck!!!
Smooches,
RobinWednesday, July 7, 2010
My First Vinyl Project (kinda...)
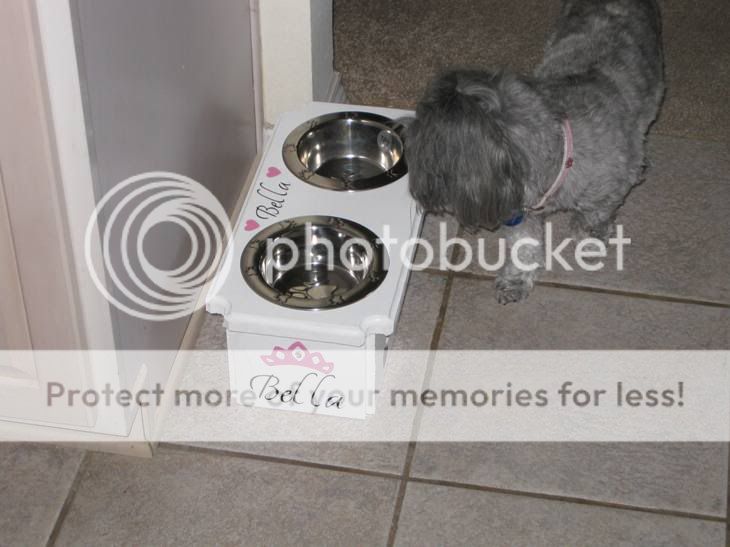
One of the crafts I have done is decorate my dog's new feeder. I had it made and I wanted it painted all white. I knew it was going to be a great canvas for me to try some things on. I have wanted to work with the vinyl again since I have only used it once (I made my store name to go on the wall in my suite). The results are pictured below. I really looove the way it came out!
- Calligraphy Collection - Bella and heart
- Paper Doll Dress Up - Crown
I added a little bling to make the crown special.
Thanks for looking and leave me some blog love!
Sunday, July 4, 2010
Sympathy Cards
While I am celebrating, my heart is a little heavy, too. I have had several friends and sorority sisters lose family members in the last few weeks. So my scrapping this week has mostly been making sympathy cards. I designed 2 cards since I have to send out about 5 cards. Here are the details for the cards. I used an Amy Butler paper stack for both cards. It was really nice since all the papers were double-sided and the colors coordinated perfectly.
With Sympathy Dove
Carts:
- Jasmine - With Sympathy sentiment
- A Child's Year - bird
- Storybook - scalloped oval
I covered the card with a piece of the coordinating paper. I then inked the edges with my SU! Close to Cocoa ink pad. I embossed the bird with my Cuttlebug Script embossing folder and put pop dots on it to give it some dimension. I glued all the pieces in place and called it done.
Carts:
- Storybook - marquee and butterflies
- Calligraphy Collection - With Sympathy Sentiment
Again, I covered the card with the coordinating paper from the paper pad. I inked the edges of the card, marquee and the top butterfly. I also embossed the marquee with my Cuttlebug Swiss Dot folder. I put a pop dot on the back of the top butterfly so that I could fold the wings out. I glued it all down and was very pleased with how it came out.