Monday, May 30, 2011

Spring Plate - Circle Blog Monthly Challenge Entry

I am pushing it here folks.  I have about 2 hours left to get my project entered into the Cricut Circle May Monthly Blog Challenge.  I just might make it!
This month's challenge was a Tic-Tac-Toe board where the crafter chose 3 squares in a tic-tac-toe formation.  Here is the 3T board and the red arrow shows what I chose to use in my project.

And here is my project!  It's a Spring Plate for my home.

Here is how I put this project together.

Carts
  • Base Camp - rectangle (welded to the grass)
  • Cindy Loo - font
  • Doodlecharms - sun
  • Gypsy Wanderings - grass, flower stem, butterfly
  • Nifty Fifties - daisy flower
  • Sugar and Spice - inside of rose
  • Tags, Bags, Boxes and More - rose
I got the plate from Wal-mart at Christmas time (there was a post on the blog using it).  It is about the size of a charger.


I used vinyl for the wording on this plate.


I used Juliana's directions and video to make the flowers.  I used different cuts but the results were still beautiful!


I love this sun cut!  It is my favorite and the one I go to when I need a sun for my project.

Side view so you can see the dimension on the flowers and all the buttons in the grass posing as flower buds!  I also used 2 layers on the butterflies that allowed me to pop up the wings. 


I hope you enjoyed this project.  Now I need to make one for Summer!  Until next time...


Smooches,


Friday, May 27, 2011

You missed me?!

Hi ladies!  I have been gone for a few weeks and I have missed scrapping and sharing with all my creative peeps.  I have been promoted at school and that has kept me crazy busy.  I also had a big event my mom and I decorated for that took the rest of my time.  But since it was using another one of my creative gifts, I thought I would share the pics with you here.

You may or may not know that my mom and I used to have a party planning business.  The talents we used in this venture were truly gifts from God.  Neither one of us went to school or have had any formal training in this area.  We don't have that business anymore but will from time to time, do events for peopole or organizations that know us and our work or who we have worked for in the past.

Last weekend, my sorority put on it's annual cotillion.  We have done the decorations since the beginning and it is a huge job!  So here are some pics from the things we made.

This is the stage decorations.  This year's theme was butterflies.

One of the centerpieces with butterflies in it.  We had to make 48 of these!

The Ice Sculpture

Me working on the ice sculpture


Thanks for checking this out.  I will be back to crafting this weekend.  I hope everyone has a safe and wonderful holiday!

Smooches,


Wednesday, May 11, 2011

Cartridge Storage Solution - Cheap Too!!!

With all the amazing cartridges that PC has been putting out lately, it is no wonder that I have run out of space to store my cartridges. So I went on the hunt for some new ways to store my carts. I tried several plastic boxes with handles, thinking that I wanted the box to be portable. None of them really worked and were expensive even with a coupon.  And since I have a Gypsy, I really don't need to carry it all with me.

On Mother's Day, I went to Joann's to get some of their carts that were on sale. I continued my search for cartridge storage solutions and had an epiphany - Photo Boxes! Velcro! A match made in heaven!

Because I had taken a couple of booklets and carts with me, I could measure the box to make sure everything would fit. When I saw they would fit, I quickly picked up 6 coordinating colors and moved on to the sewing notions. The boxes were on sale for $2.49 each.

Next, I picked up a 5' box of velcro which cost about $11. This box was more economical than buying the pre-cut round disk. I would have to do a little work to cut the velcro but it will be worth the savings.


When I got home, I organized my carts in alphabetical order (I previously had then orged by type, then alphabetical) and got to work. Once I cut the velcro into small sections, my mom and I attached the velcro to the back of each cart. I made sure to attach the soft side to the cart. Once this was done, I then attached the hook side to the top of the photo box. It's important to put the same side of the velcro to the lid or cart so as your collection grows, you can just slide your carts down in alphabetical order. The lid will hold about 16 carts this way. Make sure you leave a little room around the edge so that your top will fit on the box snuggly when replaced.

I new there would be a lot more room in the box for booklets so I decided to add some carts to the back of the box with velcro. This made for a total of 20 carts in each box.


By storing my carts this way, I can get 120 carts stored in the space that used to hold about 25 carts in their original boxes. And for about $30.00 and a little elbow grease, I think that is a steal!


What did I do with my original boxes, you might ask? I still have them. I have put them in a large plastic container and put them in storage. I just can't bear to part with them!

I hope this helps you all. If you have some great storage ideas, please share then with us. Until next time...


Smooches!

Tuesday, May 10, 2011

And the winner is....

Thanks everyone for stopping by my blog on the Thanks Mom Blog hop!  It was my first and what a blast it was. I can't wait to participate in another one.  And by the way, my mother and mother-in-law  loved the jewelry boxes and cards. 

But I know you want to know who won my bag of goodies.  So without further hesitation, the winner is...
 Also known as Lisa!  This is what she had to say.
Congrats Lisa!!! Look for an email from me to send you your bag of goodies!  Thanks everyone for playing and hopping!!!!

Smooches,

Thursday, May 5, 2011

Thanks Mom Blog Hop!!! My First!

Welcome to the THANKS MOM BLOG HOP. Thanks for joining us to enjoy all the wonderful crafty inspiration in honor of mother's everywhere from the talented designers in this hop.

You should have arrived here from Maria's Blog. If you missed the beginning of the hop, please go back to the start of the hop at Debbie's Blog to start so you don't miss any of the projects. There is a Grand Prize Blog Candy offered so you want to start at the beginning and read how to participate to win.
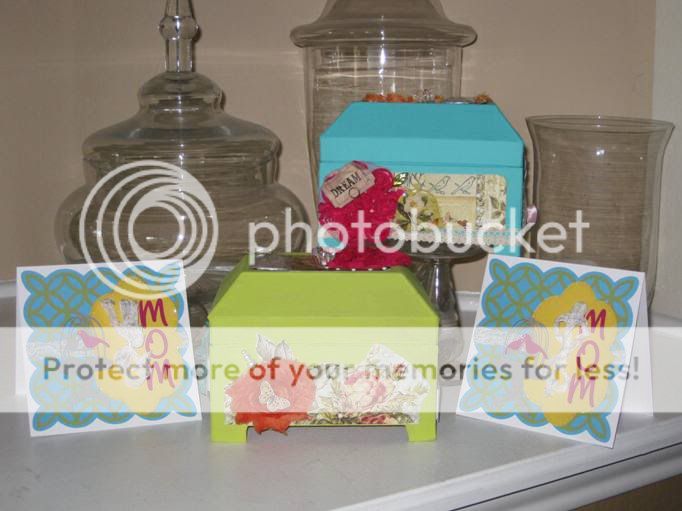
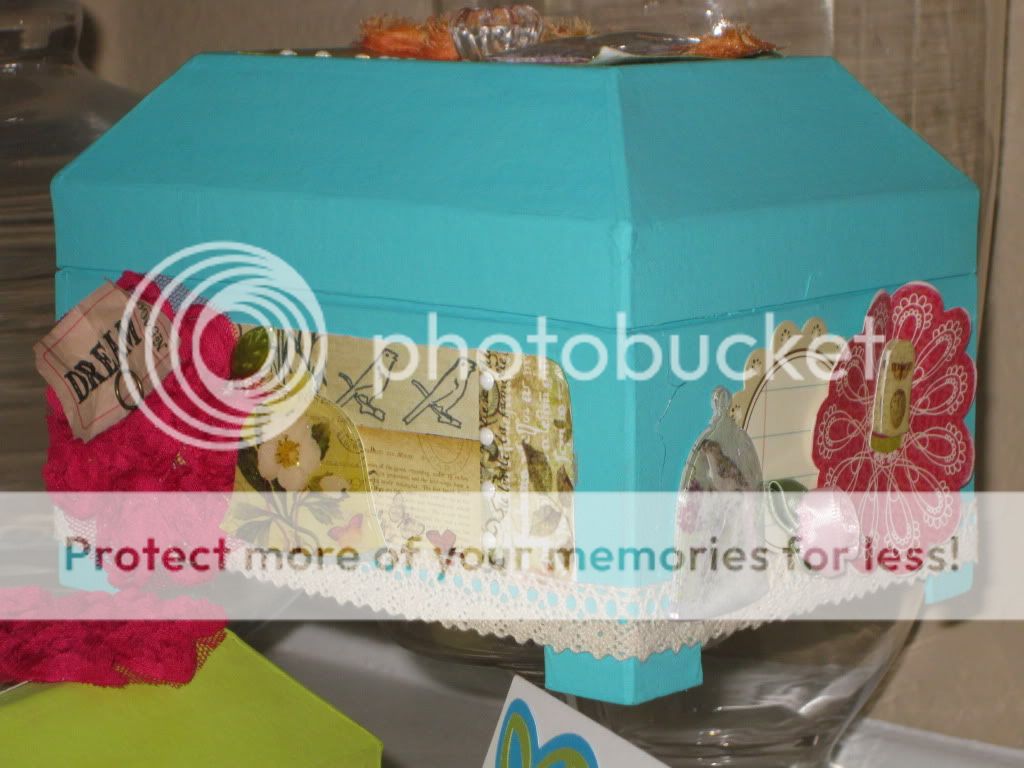
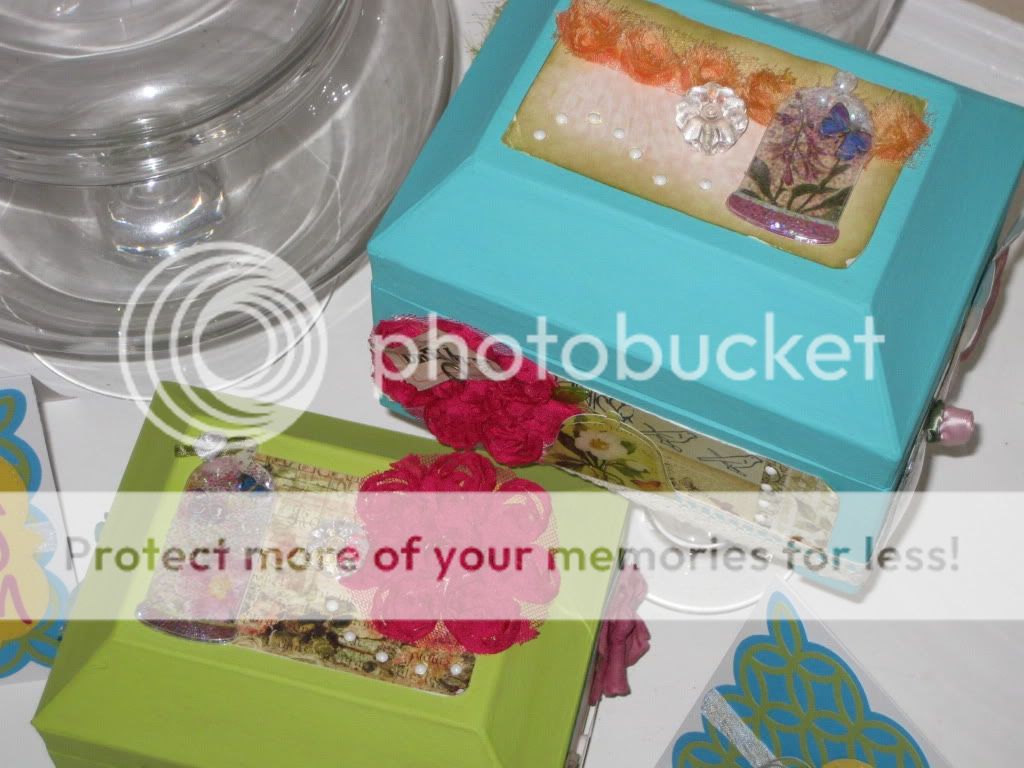
Here's my crafty goodness made especially for my mom and mother-in-law.  It's hard to get women who have everything something they don't already have.  My husband bought them each some jewelry for Christmas so I decided to make them a custom jewelry box and card.
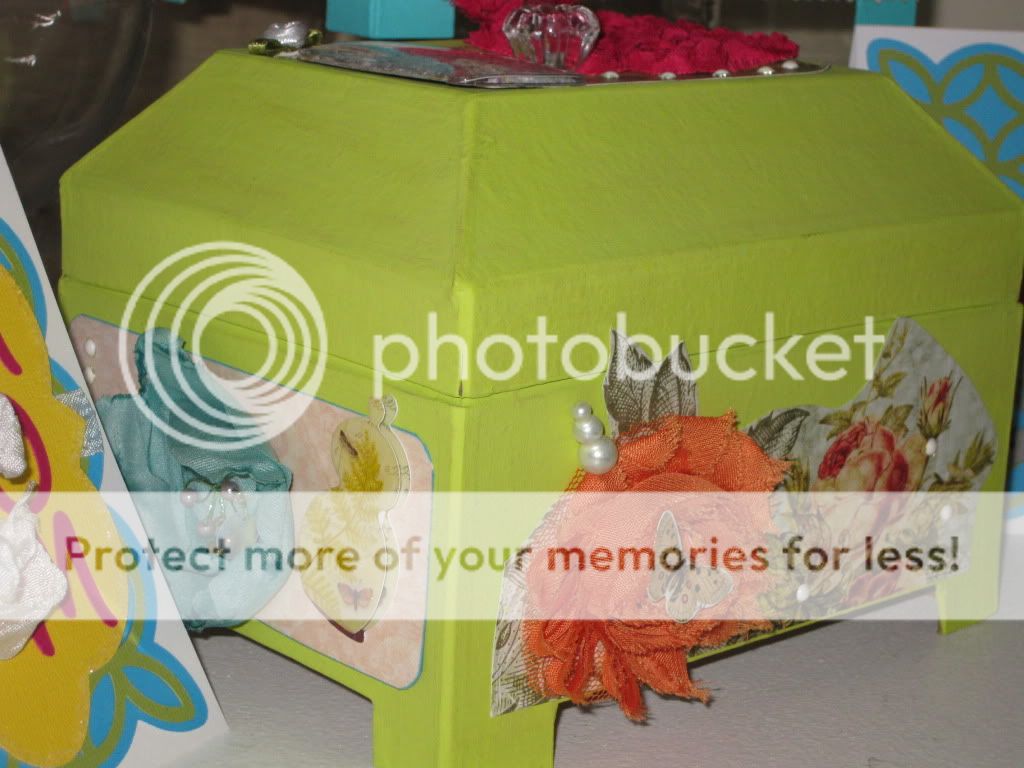
The boxes started out as a kraft colored paper mache' box.  I painted them with my Making Memories paint in some pretty Spring colors.  I covered the sides and top with some paper from the Botanical Gardens collection by Pink Paislee.  I distressed the edges before I adhered them so the boxes would have an agend appreance.

Next, I started attaching various things.  I cut some individual flowers from some ribbon I had from Webster's Pages (hot pink and orange flowers).  I also added some Prima flowers as well (aqua flower).  After that, I layered in some birdcage and terrerium stickers from K and Company.


I continued to add more findings like pins, tags and more.  I also added some pearls that I adhered with my iRock.  On top, I added some small crystal knobs I found at Hobby Lobby.  They were the perfect size for this project.  The peach colored row of flowers on the aqua box were the Tim Holtz Lavish Trimmings Ribbon that started out white.  I sprayed it with some Sunshine Glimmer Mist and a little homemade mist in orange and this is what came out.  I love it!
 I lined the inside of the box with pink satin that I glued down with hot glue.  It was kinda crude looking but it got the job done!
Now on to the card....
Carts I Used
  • Paper Lace - lattice background, shadow and sentiment
  • Once Upon A Princess - tag
  • French Manor - table
  • Winter Frolic - birdcage
This card is 5.5" x 5.5".  I used a lattice and coordinating shadow for the background of the card.  I ran a piece of white seam binding behind the lattice.


Next, I glued the word MOM on the tag.  I ran a glue pen around the edge of the tag and covered it with MS Coarse White Glitter.  After that, I ran the seam binding through a couple of slits in the tag and tied a bow.  


Lastly, I cut two of the birdcage stands.  I made this by welding the birdcage cut to a table cut with my Gypsy.  I put pop dots on one layer and attached it to the second cut.  I then glued it to the card.  Finally, I added eyes to the birds with a white gel pen.  Voila!  Project Complete!!!!

I really hope you like my project and my card.  Show me some love by leaving a comment and I'll show you some too!  Everyone who leaves a comment on MY BLOG will be entered into a contest for some Blog Candy!  I'm going shopping this weekend so I know I will pick up some goodies to give away.  Don't you want to be the winner?!  Then subscribe to my blog and leave me a comment!!!

Thanks for hopping along with us. Remember, if you leave a comment on every designers blog hop post, your name will go into the drawing for the Blog Candy that our THANK MOM BLOG HOP hostess, Debbie, is offering as a Grand Prize.
Next up on the hop , is the talented Heather!
Smooches!


Monday, May 2, 2011

Mom U Rock Card

Who is always there for you through the ups and the downs? MOM!!!  Moms rock through life with the good and the bad, taking it all in stride.  This card celebrates mom's spirit and strength as well as her fragility and grace.  Let's dig in!

Carts Used
  • Gypsy Wanderings - music note (shadow)
  • Indie Art - guitar
  • Plantin Schoolbook - sentiment
  • Cuttlebug Folder - Allegro
I used the pink Gemstones paper from Coredinations.  I really like the shimmer it gives off.  I cut a piece at 4.25" x 5.5" and embossed it with the "Allegro" Cuttlebug folder.  I attach it to the white card base.  I welded the sentiment together on my Gypsy, cut it out in silver and adhered it to the card as well.

 I cut the music note from basic black cardstock and adhere it to the card.  I cut all the pieces to the guitar and assemble it.  I add a little dimension to it by using black and white twine for the guitar strings.  Adds a nice touch, don't you think?! (You will have to cut a slit in the guitar base to feed the strings through.  Use an exacto knife.)

I put some pop dots behind the guitar to give it some lift and a shadow.  Doing this makes all the difference.  I added a few white dots here and there with my gel pen and it was complete.

I hope you like it because I love it!  Check back on Friday for my Mother's Day Blog Hop project.  It's super cute and useful.  Until then....

Smooches!