Sunday, December 19, 2010

Christmas Card #2

Where did the time go! It's the week of Christmas and I am just getting my second card posted. I guess better late then never, huh!

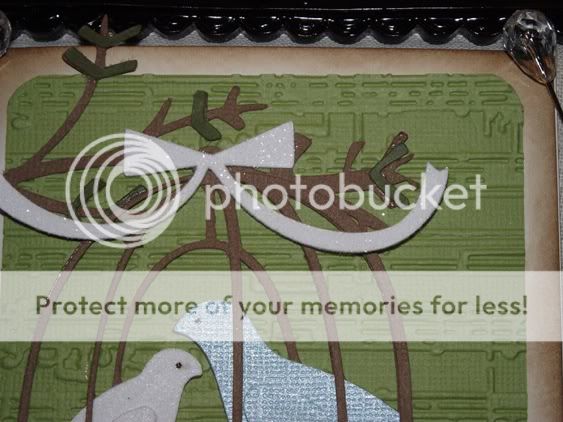
Here is my second card in the series, Merry and Bright. Here are the details.

Cartridges
  • Winter Frolic - everything (yet again!)

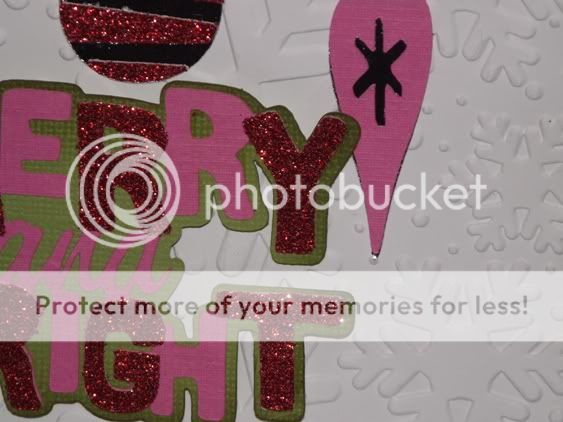
I saw the ornament image on the cart and felt it would be perfect for a one of the cards this year. I knew I wanted make the ornaments the focus so I kept the card white. But I didn't want it to be plain so I embossed it with my Snowflake folder from Sizzix.


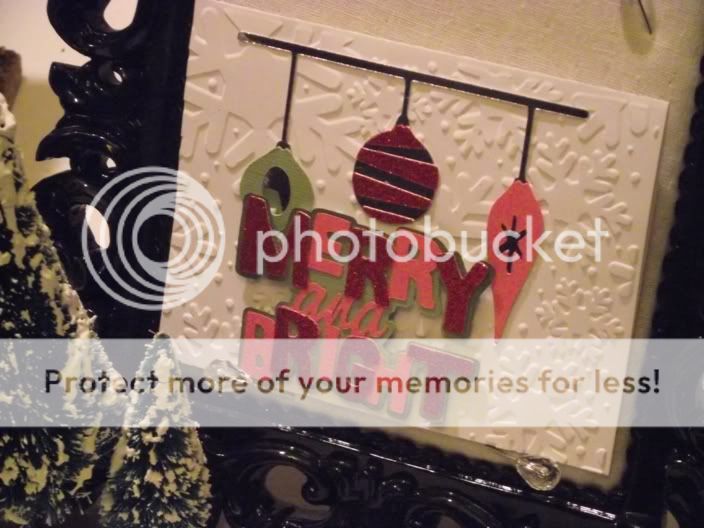
I love the combination of red, green and pink. It is very festive and little bit kid-like at the same time. So I used it on this card. I added some sparkle with the silver paper as the background of the ornaments and the red glitter paper on the title.

I inked the edges of the green background of the title to give it a little more depth. I hope it stands out more.

I hope you like the second card in my series. Leave me a note to tell me what you think. Merry Christmas!

Smooches,
Robin

Monday, December 13, 2010

Christmas Cards 2010: Card #1

It happened again! Christmas snuck up on me and I was stressing about getting my Christmas cards done. I thought to myself "I have to do better. What can I do to make this easier on myself every year?" And this is what I came up with:

A Christmas Card Series!

I am going to make 4 different cards (possibly 5) and make 10 of each card. Next I am going to make a spreadsheet with the names of the cards and designate who is going to get what card. Next year, I can make the same cards (reserving the right to make changes if I want to), change the list of recipents and save myself the headache. I potentially have my Christmas cards designed for 5 years! I feel better already!!!

This is the first card in the series - Joy to the World. Here's the details.

Winter Frolic - all the cuts on the card (It's a one cart wonder!)

I just got this cart at the Black Friday sale and I was pleasantly surprised with it. I don't know why I waited so long to get it! I embossed the background with the Tim Hotlz Texture Fades in Symphony. I inked the edges of the white card with TH Distress Ink in Vintage Photo. They really make a deep impression.

I decided I wanted all the white parts to stand out a little so I added some MS microfine white glitter by covering them in glue from a glue pen, doucing them in glitter and letting them dry. This technique makes putting glitter on so easy!

Once all the glitter was dry, I started to assemble the card. I did snip a couple of the pieces of the cage off so the birds stood out more. The branch had a birdhouse hanging from it so I snipped that off as well. I put it all in place, I put some pop dots behind thewhite parts and adhered them all in place.

I hope you like this first card in the series! Leave me some blog love and I hope you have a wonderful Christmas and a blessed New Year!

Smooches,

Sunday, December 12, 2010

Christmas Tree Shirt - My First!

As long as I have had a Cricut, I am just now starting to explore what it can cut besides paper. I took my first foray into vinyl this year (love that stuff!) and now I have tried fabric! Man was this easy!!!! I have been wanting to do this for a while but I have to admit - I was a little intimidated. But I saw this idea and knew this was my opportunity to try it out.

Most of you know that I have a Gypsy. I knew I wanted to put a tree on my shirt so I searched on my G for the perfect tree. I ended up finding what I wanted on the Create A Critter cartridge under Accessories. I made it about 8.5" wide and 7" tall to fit an XL t-shirt I picked up at Target.

Before I cut the fabric, I ironed it to get any wrinkles out. I had seen a video on YouTube about using Steam-A-Seam 2 as the fusable mesh (click here for video) so I ironed that to backside of the fabric. I cut my piece out and adhered it to my Cricut Mat with the right side of the fabric down (very important!). I then cut out my tree. I used Multicut x3 to ensure that my project came out as clean as possible.

**IMPORTANT** Because I used an image that was symmetrical, I didn't have have to flip my image around. But if you want to cut words or an image that is not symmetrical, you will have to flip your image with DS or the G. Otherwise, your words will be cut backwards since the fabric is facing the mat.

Once my image was cut, I ironed my image on my shirt following the iron setting recommendations of the Steam-a-Seam. It worked like a charm! I then ironed some Tulip iron-on bling (I have to have bling on most everything) on the tree to make it sparkle. I then decided to make a ribbon tree topper so I just ran a stich along the edge of a piece of double-faced satin ribbon and pulled the string tauwt. I then stiched it all together to make a kind of ball shape. I stiched that to the shirt and it was complete. I wore it to a charity event and got lots of compliments on it. Here are some closeup pics.


Thanks for looking and have a Merry Christmas!

Smooches,

I got my camera back!

I was finally able to meet up with my husband's Godsister and pick up my camera. I am so happy to have it back! I have tons of projects to show you starting tonight.

I also tried something differnet this year for my cards. I will premiering my Christmas Card Series tomorrow!!!!! So check back to see the first card and my idea on how to make the card designs work for you!

Smooches,

Robin

Friday, December 10, 2010

I need my camera back!!!!

I am so frustrated right now but it is my own fault! My husband and I were working on a charity event this past weekend and I left my brand new camera at the restaurant. I took it to try to get some exprience using it. It is a larger camera that needs a large bag, the kind I am not used to carrying. I am used to throwing my other bag for Point and Shoot in my purse.
Luckily, my husband's God Mother picked it up for me. Whew! The only problem is that she lives an hour away and I haven't had time to go get it. This week has been CRAZY busy! I had some pics on there of projects I have completed that I needed to post. I guess I will just have to be patient until I can get it. That's not easy for me....

Wish me luck!

Smooches,

Robin

Friday, December 3, 2010

Scrapbook.com Holiday Video

I just had to share this video I saw on Jana Eubank's site. It's it dreamy?!?!?!


Smooches,

Robin